Architecture and Gaming – the Unreal Engine [1]
Unreal As I told you here, I started playing around with Virtual Reality, a few time ago. The first tool I started playing around with was Unreal. No particular reason aside from the fact that I already played with it back in the days when I was modding stuff for fun, so I though this gave […]
Unreal
As I told you here, I started playing around with Virtual Reality, a few time ago.
The first tool I started playing around with was Unreal. No particular reason aside from the fact that I already played with it back in the days when I was modding stuff for fun, so I though this gave me a vantage point. Plus, the gaming community around Unreal is very active (you might have heard about the Unreal Tournament) and I thought I could easily reach out to somebody in case I needed help. As it turns out, this is true for all the technologies I am going to talk about.
1. Installing the stuff
In order to install the Unreal engine, you need to their website and install the Epic Games Launcher (this might alert your IT manager so you might want to warn him beforehand that you are not going to start playing videogames in the office).

This Launcher is a sort of control panel through which you can install everything Epic, including the Unreal Engine. This will also allow you to manage various additional items you might want to buy in the Marketplace, but more on that later.
Long story short, you launch the Launcher and then, from the Launcher itself, you’ll be able to launch the Engine.

The Launcher also serves as a surfer for some spotlights of work from the Community, some free Learning tools, the Marketplace itself and the Library of your stuff.
The Game Engine itself will offer you the option between surfing through your projects or creating a new project, so at this point you might want to hit the “new” button. Mind that the End User License Agreement makes the use of the engine practically for free, so that’s another amazing thing about it in case your BIM manager make you suffer from delays in approval of your R&D budget. Hit merrily the tab that says “new” and let’s talk about it, then.
2. Create a New Project

The Templates are something cool you can use if you have a clear picture of what you want. These are the templates you have at your disposal:
- First Person, which provides you with stuff like an already programmed moving system for your character, and it might be a good start for a virtual reality project indoors;
- Flying, spaceship included, also a good start if you have a masterplan;
- Puzzle, with a simple grid of blocks for your favourite passtime but maybe not for your architectural project;
- Rolling, with a physics-based rolling ball that can be rolled against your facade: as much as you might be tempted to pick this template, this also might not be a good choice;
- Side Scroller, in case you wish to set up a platform game in your perspective sections;
- 2d Side Scroller, if you’re really traditional and you want a platform game in your regular sections;
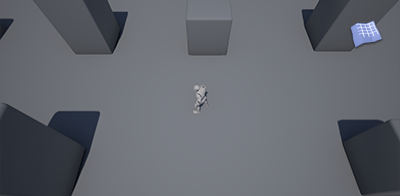
- Third Person, to move around your project a playable character, and I can’t even begin to think how this is going to be odd with Virtual Reality;
- Top down, a special kind of third person where the camera is behind the playable character;
- Twin Stick Shooter, the third person for a spaceship;
- Vehicle, a top down template with a car you can drive around your favourite parking lot;
- Virtual Reality, a blueprint with modules for teleporting
- Vehicle advanced, a pimped-up version of your vehicle blueprint.
.


 .
.
The other options below are about whether you want to start developing something for desktop or for mobile, whether you want raster or vector (sort of), whether you want starter content to helop you with or not. You might want to have settings as below.

Now, in Singapore, Dominic Maartens was advising you not to use the Virtual Reality template and offered a nice workflow demonstration. He was right, of course. The Virtual Reality template is a tad too complicated if you are approaching the engine for the first time, so I suggest you take it step by step and, first things first, you figure out how to take your model out from Revit and into Unreal.
Once you hit the “new” button, you will be asked to name your project (no spaces nor special characters allowed so I suggest you make up a codelist for your projects) and the editor will start.
3. What’s in the “blank” Project
In case you’re wondering if I lost my mind, the “blank” project is not blank. It actually has few stuff inside it. If you started with the “starter content” you’ll get (guess what?) some starter content.

It’s useful to deconstruct it in order to understand how the editor works but before you start to freak out let’s take a quick tour around and see what we have in the setting.
3.1 World Outliner

The world outliner is a content browser: it shows you, organized by Category and dependencies, everything you have loaded inside your environment.
Here for instance we have a World (the Minimal_Default) that contains:
- Audio.
You can import a set of audio files to play within what we are going to call your “level”. They can be ambient sounds playing independently from a source within your model or even sounds you can turn on and off as you wish by clicking on something. For instance, you can have your excavator working in the yard and making his excavator noise or you can have the radio playing on the counter of the kitchen you are designing and allow the user to turn it on and off. Both options are, in my opinion, pretty cool. - Items related to the gameplay (GamePlayActors).
These are things like the player starting point. - Lights.
They work as volumes, like light sources in the Revit families. - Effects of reflection on volumes;
- Sky, fog and other atmospheric elements;
- Objects, here categorized as StaticMeshes;
- Volumes, which are 3d invisible elements generating effects: you can read more on those here.
Of these elements, what you can expect to get from your Revit model are, basically, the Static Meshes. Everything else you’ll have to work with in the Engine, so you’ll better start and understand how those item works, otherwise you’ll be using the Engine like a really really painful model surfer. That’s not what we want, right? We want interactivity, we want sounds and lights, we want stuff blowing up and zombies coming at you from the swimming pool. Yes. We do.
So, let’s see what we have. If you click on one element in the scene, the “Details” tab will show you its properties.
For instance, let’s select a simple object like the chair. You’ll be able to tell it’s selected because it gets surrounded by a thick yellow line.

First of all, it will tell you the coordinates of insertion for this element and degree of interaction that will be allowed in gameplay. This particular chair is static.

A Static element is an element that you won’t be able to move. You might be able to rig your playable character in order to sit on it (if you’re curious, instructions to do it may be found for instance here) but you won’t be able to kick it around or shoot it up.
You have higher levels of interaction, that are the Stationary and the Movable.
With the Stationary, the element can’t be moved but is influenced when it’s hit by light, for instance: that is considered to be a change because the engine will have to re-render it. I highly suggest you have it do that: your scene will be slower but otherwise you might not get a realistic experience out of it.
With the Movable set up, the object is totally dynamic: you will be able to move it and to change it completely, meaning you can have the player damage it, for instance. Or you can have different chairs loaded into one and allow the user to switch between them by clicking on them, which would be pretty useful to evaluate design options.
The second portion of the properties is the mesh itself, the actual geometry of the object. You can change geometry without changing the whole component and it will keep all the other properties you are setting up. Since I kind of hate that chair, and I bet you do too, I’ll start with something simple and I’ll import one of my Revit families into the project, to change it with.

Unreal imports only fbx files. Yeah. I know. The good news is that you can open your Revit family and export it to fbx. If you have a .3ds file (maybe because you downloaded it from the website of the supplier) you can convert it with this free tool from Autodesk.
If you hit “import” the content browser below, and select your FBX, your object will be deconstructed and prepared into different components so that you can import them individually into your level. You don’t want that. You want to import your component as a whole. You get the same result , if you choose File -> Import into Level. No worries.

Just select all your groups of object, give them a decent name, drag them into the scene and group them. By right-clicking on the object, you’ll be offered an option to Convert Actors to Static Mesh. After that, you can work on the object and erase all subcomponents from existence.

The Static Mesh can be opened into its own editor, so that you can play around with materials, add geometry and everything you might need.

Materials can either be set inside the Static Mesh editor or by instance to the mesh inside. What you do by instance overwrites what you did in the editor, so be careful.

Now, my armchair is a real one. It’s called Barchetta, it’s designed by Antonio Citterio for Flexform and I think it’s one of the most elegant products of this season. You can find details about it on this page. Thing is, I don’t want you to go on the supplier’s website: I want you to be able to draw those information within the scene. In order to do that, you’ll have to code. So let’s put that aside for one moment.
Using the same technique, give me a sec to replace the ugly table as well.

Now, let’s assume you want to do something a little more interesting with materials. You can either choose among a set of materials already provided in the Starter Content kit or you can try and create your own because hey, we’re designers, so the default materials are not going to be enough, that’s for sure.

Creating a new material is easy: you import a picture.
Let’s say I want a put a decorated carpet underneath everything: I import the picture and it will get loaded alongside the other materials.

It stays down there, with all materials, but if you hoover it with your mouse you see it’s actually a texture and not a real material.


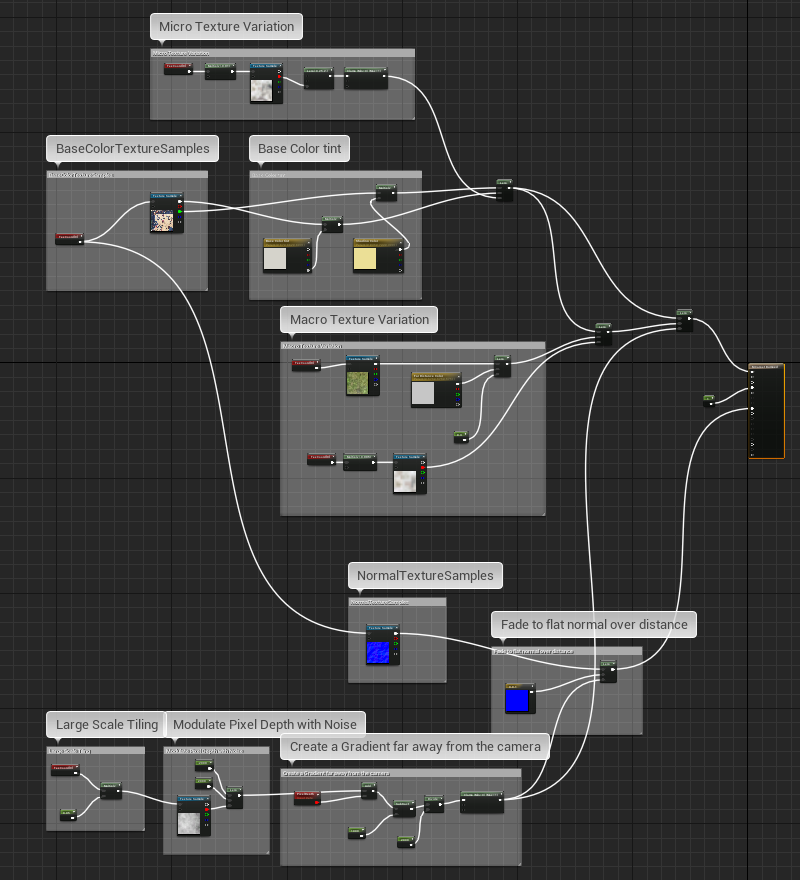
In order to create a material, the texture needs to be put into system with lots of other properties, such as bump, glossiness, refraction, tiling and so on. Now, if you’re expecting to have a control panel as you have in Revit (or 3ds Max, for that matter) you’ll be disappointed. Materials in Unreal are the result of a little bit of visual scripting. I’ll get into detail with that in a minute.
I suggest you start by duplicating something similar to what you want, in terms of physical properties, and work from there.

Everything good so far?
Good.
Applying a material is even easier: you drag it and you drop it on the geometry and the trick is done.
3.3 Effects: let’s burn the house down
So far we’ve been boring. If you want to add some effects to your scene, you can start by adding few of the free effects you have in the starter content. They are in the Blueprint category because they are complex objects with lots of things into one: they have geometry, animation, sound, light and so on. For instance you can set a fire.

We are starting to have a little more than what we could do with a simple navigation inside our model, right?
You also have other elements to help you out with your environment. One of them is the atmospheric fog.

3.4 Interaction
Still, so far we’ve been boring.
There’s no point in moving your Revit file all the way to Unreal unless you can interact with stuff, right? Well, it’s going to take a little tweaking around, but it’s possible and after a while it isn’t even so difficult. This is how an openable door looks like.

Now, I can’t promise that I’ll have time to do it, with everything that has been going on, but if I can I’ll try to give you three simple tutorials to get your basics right:
- tips and tricks to move from Revit to Unreal without (too much) pain;
- how to tame materials and make them interesting (yes, they can move too);
- how to have an operable something.
Stay tuned.
Thanks for posting this
May I ask you to expand this? Perhaps provide any further example? Thank you!
This seems to be a hot topic for you guys. I’ll see if I can get my hands on writing something more, although presently I confess that my professional efforts and researches are lying elsewhere.